Using Raspberry Pi to monitor and water plants
September 2018 (671 Words, 4 Minutes)
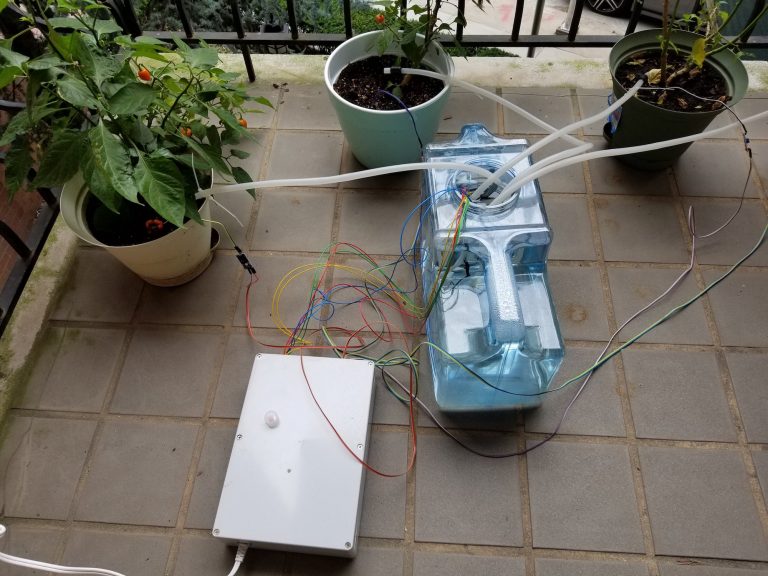
I built a computer-driven watering station that takes care of my peppers for me. At this point, my involvement is only needed to periodically add water to the water tank (about once every 2-3 weeks). Apart from that, the system is fully self-driven.
Introduction
I’ve been growing hot peppers on my balcony and one of the things I constantly fail to keep on schedule is watering them. As it is with many chores, this is something simple yet not exciting enough to avoid being actively procrastinated on.
As such, I only saw several solutions to that problem:
- Become better at avoiding procrastination (yeah, ri-i-i-ight!)
- Outsource the activity to some hapless family member.
- Get rid of the peppers.
- Throw technology (and time, and money) at the problem.
Given all those options, the choice was rather simple. As a result, I built a computer-driven watering station that takes care of my peppers for me. At this point, my involvement is only needed to periodically add water to the water tank (about once every 2-3 weeks). Apart from that, the system is fully self-driven.

In its current incarnation, the system handles 4 pots (number of pots
is limited by current hardware – in theory it should be possible to
add more relays and moisture sensors). It periodically measures
moisture level of the soil in each of the pots. When it decides the
soil is “dry enough” it waters the plant. It also makes sure watering
has the desired effect (i.e. preventing conditions like tank running
empty or watering tube being misplaced). Finally, it posts all kinds
of stats on a dashboard. (not yet, actually).
Bill of materials
- Raspberry Pi
- 4-channel relay board
- 5V submersible pumps (4)
- TE215 moisture sensors (4)
- ADS1115 ADC converter
- Momentary push button
- 4 USB-A cables (I used cheapo 30-pin old-style Apple ones)
- 5-port USB charger
- Plastic enclosure
- A suitably large water tank
- Silicone tubing
Principles of operation
The idea is to use off-the-shelf components rather than more complex pre-assembled pieces.
The role of the controller is played by Raspberry Pi. In theory, the device could be similarly implemented using a simpler board, like Arduino, but Raspberry Pi is a full-fledged computer and is very flexible as such, so I decided to trade some simplicity and power economy for potential future flexibility.
The computer takes care of the following hardware:
- 4 pumps, which it operates via relay (conveniently enough, a 4-relay board is available).
- 4 analog moisture sensors (read through ADC as Pi doesn’t have analog GPIO).
In addition to that, I also wanted a convenient way to cleanly shut the device down, as opposed to just yanking the power cord (might corrupt the filesystem) or ssh’ing into the device (inconvenient). For that purpose, I’ve added a dedicated button – pressing it for 5 seconds initiates a clean shutdown.
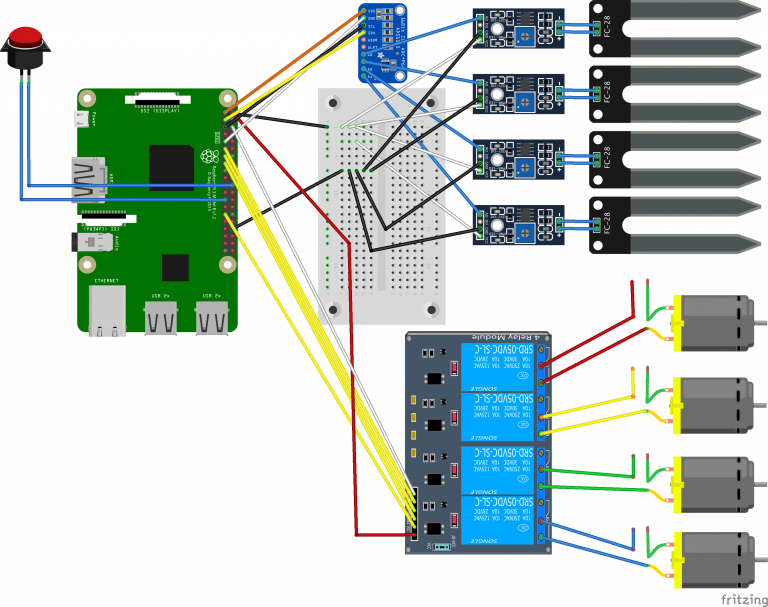
Schematics
(This is my first attempt at Fritzing, so pardon the crow’s nest of the wires…)

Building the system

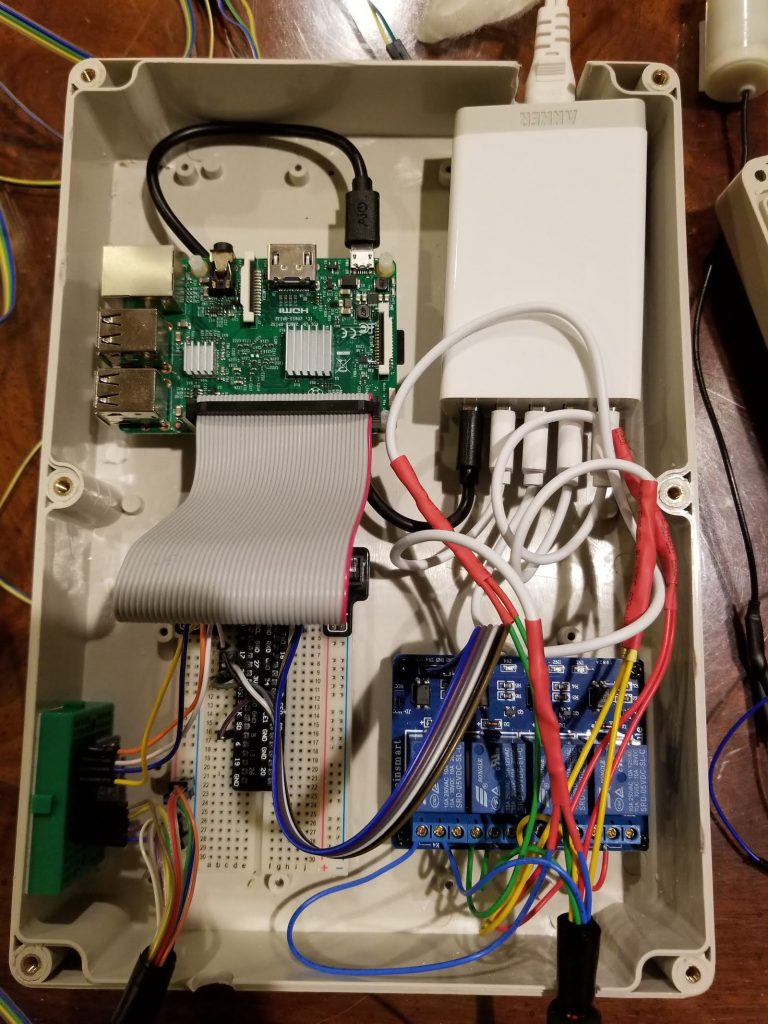
One great idea I borrowed from here was to use USB charger as a power source for the pumps. Taking it a bit further, I’ve also used the same charger to feed the Raspberry Pi, which resulted in a fairly neat design.
Having a solid enclosure is critical as the device is going to be outdoors, subject to elements. Luckily, there are plenty of outdoor-rated electrical equipment boxes, which could be utilized for that purpose.
One final note is the temperature handling. The device is almost fully sealed (as it is located outside and is subject to elements) which might be an issue for Raspberry temperature. However, the load is light enough and so far the temps have been reasonable.
Software
The system is managed using 2 scripts (see Github repo for details):
watering_stationis responsible for monitoring and watering. It runs hourly via cron.shutdown_buttontakes care of graceful shutdown when push button is pressed and held for 5 seconds. It starts at system boot viasystemdand keeps running.
When setting up a new system, one has to make sure to enable I2C via
raspi-config, otherwise connection to ADC will not work.
Future work
One of the future enhancements to the system will be adding a visual indicator of the activity. In the past, I periodically encountered situations where Raspberry Pi (previous generations, using external Edimax wireless adapter) would quietly lose the connection or sometimes get locked up after long uptime. Having a visual indicator of the device status would definitely help. That will be either an RGB LED (indicating status by different colors) or a tiny LCD display – I am yet to decide which one makes more sense.
Furthermore, since the device is already out there, I’m considering adding a Raspberry camera module to also show me the plants on demand.